

Peanut Butter Spider Cookies – Easy Halloween Cookie Recipe
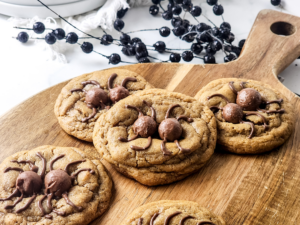
Looking for a fun and delicious Halloween cookie recipe? These adorable Peanut Butter Spider Cookies are made with soft, chewy peanut butter cookies, chocolate malted milk balls, and melted chocolate spider legs.
They’re the perfect combination of sweet, spooky, and delicious! Whether you’re hosting a Halloween party, baking with the kids, or putting together a festive dessert table, these homemade Halloween spider cookies are sure to be a hit.

Why You’ll Love These Halloween Spider Cookies
Halloween baking doesn’t have to be complicated or expensive. These peanut butter spider cookies turn a classic homemade cookie into an adorable Halloween treat with just a little chocolate and creativity.
- Easy to make: Simple ingredients and straightforward baking instructions.
- Perfect for Halloween: Chocolate spiders make these cookies a festive addition to any Halloween celebration.
- Kid-friendly decorating: Kids can help add the candy spider bodies and decorate cooled cookies.
- Soft and chewy: Melted butter, brown sugar, and peanut butter create a delicious cookie base.
- Great for parties: Makes approximately 15–18 cookies, perfect for sharing.
- Budget-friendly: Made with common pantry ingredients and a few chocolate decorations.
Ingredients for Peanut Butter Spider Cookies
These homemade Halloween cookies start with a soft peanut butter cookie dough and are finished with chocolate malted milk balls and piped chocolate legs.
Cookie Batter
- ¾ cup unsalted butter, melted
- ⅓ cup smooth peanut butter
- 1¼ cups dark brown sugar
- ¼ cup white granulated sugar
- 1 teaspoon vanilla extract
- 2 eggs
- 2¼ cups all-purpose flour
- ½ teaspoon baking powder
- ½ teaspoon baking soda
- ½ teaspoon salt
Spider Decorations
- Malted milk balls, 2 per cookie
- ¼ cup milk chocolate chips, melted

Kitchen Equipment You’ll Need
- 9×13 baking sheet
- Parchment paper
- Large mixing bowl
- Whisk
- Spatula
- Cookie scoop
- Plastic wrap
- Piping bag
- Microwave-safe bowl
How to Make Peanut Butter Spider Cookies
Follow these simple instructions to make soft peanut butter cookies topped with adorable chocolate spiders.
Step 1: Mix the Butter, Peanut Butter, and Sugars
In a large mixing bowl, combine the melted unsalted butter, smooth peanut butter, dark brown sugar, and white granulated sugar.
Whisk the ingredients together until the mixture is smooth and well combined.
Step 2: Add the Eggs and Vanilla
Add the eggs and vanilla extract to the peanut butter mixture.
Whisk again until everything is fully incorporated.
Step 3: Add the Dry Ingredients
Add the all-purpose flour, baking powder, baking soda, and salt to the mixing bowl.
Using a spatula, gently fold the dry ingredients into the wet ingredients until a cookie dough forms.
The dough will be softer than traditional cookie dough because this recipe uses melted butter. This is completely normal.
Step 4: Chill the Cookie Dough
Cover the mixing bowl with plastic wrap or wrap the dough securely.
Place the dough in the refrigerator and chill for 30 minutes.
Chilling helps the dough firm up, making it easier to roll into cookie balls.
Step 5: Prepare the Baking Sheet
Preheat your oven to 350°F.
Line a 9×13 baking sheet with parchment paper to help prevent the cookies from sticking.
Step 6: Shape the Cookies
Scoop medium-sized portions of cookie dough and roll each portion between your hands to form an evenly shaped ball.
Place the cookie dough balls onto the prepared baking sheet, leaving approximately 2 inches between each cookie.
Gently press down on each dough ball with your fingertips before baking.
Step 7: Bake the Peanut Butter Cookies
Place the baking sheet in the preheated oven and bake for approximately 13 minutes, or until the edges are slightly golden.
Avoid overbaking. The cookies will continue to firm up as they cool.
Step 8: Add the Spider Bodies
Immediately after removing the cookies from the oven, place two chocolate malted milk balls side by side in the center of each warm cookie.
These two chocolate balls create the spider’s body.
Allow the cookies to cool for approximately 5 minutes.
Step 9: Melt the Chocolate
While the cookies cool, place the milk chocolate chips into a microwave-safe bowl.
Microwave in 30-second intervals, stirring between each interval until the chocolate is completely melted and smooth.
Transfer the melted chocolate to a piping bag and cut a small opening at the tip.
Step 10: Create the Chocolate Spider Legs
Using the piping bag, create four chocolate legs coming out from the first malted milk ball.
Pipe two legs on each side, curving the chocolate downward.
Repeat the process on the second malted milk ball, curving the legs upward to complete the spider design.
Allow the chocolate decorations to set before serving.
Step-by-Step Spider Cookie Process Photos
Follow along with the original recipe photographs showing how these Halloween Peanut Butter Spider Cookies come together, from mixing the dough to creating the chocolate spiders.


Tips for Making the Best Peanut Butter Spider Cookies
- Use creamy peanut butter: Smooth peanut butter gives the cookie dough an even texture.
- Chill the dough: Don’t skip the 30-minute chilling time. It makes the dough easier to handle.
- Don’t overbake: Remove the cookies when the edges are lightly golden for a soft center.
- Add the candy while warm: Placing the malted milk balls onto the cookies immediately after baking helps them settle into the surface.
- Use a small piping tip: Thin chocolate lines make the spider legs easier to create.
- Let the chocolate set: Allow the decorations to firm up before stacking or storing the cookies.
Can Kids Help Make Halloween Spider Cookies?
Absolutely! These homemade spider cookies are a fun Halloween baking activity for families.
Younger children can help measure ingredients, roll cookie dough balls, and place the malted milk balls on the cookies once an adult has ensured they are safe to handle.
Older children may enjoy using a piping bag to create their own chocolate spider legs.
Every cookie can have a slightly different spider design, which makes decorating even more fun.
How to Store Peanut Butter Spider Cookies
Once the cookies have cooled completely and the chocolate decorations have hardened, transfer them to an airtight container.
Store at room temperature in a cool, dry place for approximately 3–4 days for best quality.
Place parchment paper between layers to help protect the chocolate spider decorations.
Can You Freeze Peanut Butter Spider Cookies?
Yes! These peanut butter cookies can be frozen for later enjoyment.
For the best results, freeze the baked cookies before adding the malted milk balls and chocolate decorations.
Once completely cooled, place the cookies in a freezer-safe container with parchment paper between layers.
Freeze for up to 2–3 months for best quality.
When ready to serve, thaw the cookies at room temperature and decorate with fresh chocolate spiders.
Fun Ways to Serve Halloween Spider Cookies
These spooky peanut butter cookies are perfect for Halloween parties, fall gatherings, and festive dessert tables.
- Halloween Dessert Platter: Arrange the spider cookies on a serving tray with other Halloween treats.
- Spooky Cookie Board: Pair them with chocolate-covered pretzels, Halloween candy, and festive cookies.
- Halloween Treat Bags: Package individual cookies in clear treat bags after the chocolate has completely hardened.
- Movie Night Snacks: Serve with popcorn and hot chocolate during a family Halloween movie night.
- Halloween Party Dessert Table: Display them alongside cupcakes, brownies, and other spooky sweets.
Budget-Friendly Halloween Baking
At Crazy For Couponing, we love finding ways to celebrate the holidays without spending a fortune.
These homemade Peanut Butter Spider Cookies are a great example of turning everyday pantry ingredients into an adorable Halloween dessert.
Watch for grocery store sales on peanut butter, baking ingredients, chocolate chips, and Halloween candy.
You can also save money by purchasing store-brand baking essentials and using ingredients you already have in your pantry.
Peanut Butter Spider Cookies Recipe Card
Easy Halloween Peanut Butter Spider Cookies
Soft, chewy peanut butter cookies decorated with chocolate malted milk balls and melted chocolate spider legs. Perfect for Halloween parties and family baking.
Ingredients
- ¾ cup unsalted butter, melted
- ⅓ cup smooth peanut butter
- 1¼ cups dark brown sugar
- ¼ cup white granulated sugar
- 1 teaspoon vanilla extract
- 2 eggs
- 2¼ cups all-purpose flour
- ½ teaspoon baking powder
- ½ teaspoon baking soda
- ½ teaspoon salt
- Malted milk balls, 2 per cookie
- ¼ cup milk chocolate chips, melted
Instructions
- Combine melted butter, peanut butter, brown sugar, and white sugar in a large mixing bowl. Whisk until smooth.
- Add eggs and vanilla extract. Whisk until fully combined.
- Fold in flour, baking powder, baking soda, and salt until a soft cookie dough forms.
- Cover the dough and refrigerate for 30 minutes.
- Preheat oven to 350°F and line a baking sheet with parchment paper.
- Roll medium-sized dough balls and arrange approximately 2 inches apart on the baking sheet.
- Gently flatten each dough ball with your fingertips.
- Bake for approximately 13 minutes or until the edges are lightly golden.
- Immediately place two malted milk balls in the center of each warm cookie.
- Allow the cookies to cool for 5 minutes.
- Melt chocolate chips in 30-second microwave intervals, stirring between each interval.
- Transfer melted chocolate to a piping bag.
- Pipe four legs around the first malted milk ball and four legs around the second to create the spider.
- Allow chocolate to set before serving.
Recipe By: Marvinette Hale | Crazy For Couponing
Frequently Asked Questions About Spider Cookies
Can I use crunchy peanut butter instead of creamy?
Yes, crunchy peanut butter can be used, but it will add small peanut pieces and change the texture of the cookies.
What candy works best for spider cookie bodies?
Chocolate-covered malted milk balls work especially well because their round shape creates a realistic spider body.
Why do I need to chill the cookie dough?
Chilling helps firm up the soft dough made with melted butter. This makes the cookies easier to shape and helps control spreading during baking.
Can I make the cookies ahead of time?
Yes! Bake the peanut butter cookies a day ahead and decorate them closer to serving time for the freshest appearance.
Can I use dark chocolate for the spider legs?
Absolutely! Dark chocolate or semisweet chocolate chips can be substituted for milk chocolate.
Make Halloween Extra Sweet with Peanut Butter Spider Cookies
These adorable Peanut Butter Spider Cookies are the perfect combination of a classic homemade cookie and a fun Halloween decoration.
With soft peanut butter cookie centers, chocolate malted milk ball spiders, and delicate chocolate legs, they’re a festive treat that’s just as fun to make as it is to eat.
Whether you’re baking for a Halloween party, planning a family activity, or simply looking for an easy seasonal dessert, these homemade Halloween spider cookies are sure to bring a little spooky sweetness to your celebration.
Give this recipe a try and share your creations with Crazy For Couponing!
Looking for more Halloween recipes, seasonal inspiration, and money-saving ideas? Visit Crazy For Couponing for more ways to celebrate while staying on budget.
Savings to Splurge