
DIY Vanilla Bean Lotion Bars – Easy Homemade Skincare Recipe
Looking for a simple way to make your own moisturizing skincare products at home? These DIY Vanilla Bean Lotion Bars combine shea butter, coconut oil, beeswax, and vanilla for a rich, solid lotion that’s convenient to use and easy to make.
With just a handful of ingredients and a silicone mold, you can create 12 individual lotion bars that are perfect for keeping in your bathroom, taking along when traveling, or packaging as thoughtful homemade gifts.

Making your own lotion bars is a fun DIY project that lets you choose the ingredients and customize the fragrance.
Unlike traditional liquid lotions, these solid bars don’t require a pump or squeeze bottle. Simply warm one against your skin and massage the softened oils and butters into dry areas.
The result is a convenient, rich moisturizer with a soft vanilla scent.
What Are Lotion Bars?
Lotion bars are solid moisturizing products made by combining oils, butters, and waxes.
They look similar to small bars of soap, but instead of using them to cleanse your skin, you rub them gently over your hands, elbows, knees, or other dry areas.
Your body warmth helps soften the surface of the bar, releasing a small amount of moisturizing oils and butters.
Because lotion bars are solid, they are easy to store in small containers and convenient for travel.
Why You’ll Love These DIY Vanilla Bean Lotion Bars
- Easy to make: Just a few ingredients and simple melting and pouring steps.
- Rich and moisturizing: Shea butter and coconut oil help soften and condition the skin.
- Convenient size: Makes 12 small bars that are easy to store.
- Great for gifts: Package them in small tins or decorative containers.
- Customizable: Use different silicone molds to create unique shapes.
- Budget-friendly: A homemade skincare project using ingredients that can be purchased in larger quantities for multiple batches.
Ingredients for DIY Vanilla Bean Lotion Bars
You only need five main ingredients to make these homemade vanilla lotion bars.
Important: The shea butter, coconut oil, and beeswax must be measured by weight using a kitchen scale, not by volume.
Ingredients
- 1.5 oz shea butter
- 1.5 oz coconut oil
- 1.5 oz beeswax
- 15 drops vanilla essential oil suitable for topical use
- ¼ teaspoon vanilla bean powder
Supplies
- Square silicone mold with 12 cavities
- Microwave-safe measuring cup with spout
- Wooden craft stick for stirring
- Kitchen scale
- Airtight storage container

What Does Each Ingredient Do?
Shea Butter
Shea butter is a rich plant-based butter commonly used in moisturizing skincare products. It helps create a smooth, conditioning feel when applied to the skin.
Coconut Oil
Coconut oil helps the lotion bar glide over the skin and contributes to its moisturizing texture.
Beeswax
Beeswax gives the lotion bars their solid structure and helps the oils and butter remain in a convenient bar form at room temperature.
Vanilla Essential Oil
Vanilla adds a warm, sweet fragrance to the lotion bars.
Use only a skin-safe vanilla fragrance ingredient and follow the supplier’s recommended dermal-use limits. Products sold as vanilla essential oil may differ in composition and concentration.
Vanilla Bean Powder
Vanilla bean powder adds tiny natural vanilla specks to the finished bars and contributes to their handmade appearance.
How to Make DIY Vanilla Bean Lotion Bars
These homemade lotion bars are simple to prepare. Follow the directions below to melt, combine, pour, and set your bars.
Step 1: Measure Your Ingredients
Using a kitchen scale, measure:
- 1.5 ounces of shea butter
- 1.5 ounces of coconut oil
- 1.5 ounces of beeswax
Set aside the vanilla essential oil and vanilla bean powder until after the oils and wax have melted.
Step 2: Combine the Shea Butter, Coconut Oil, and Beeswax
Place the measured shea butter, coconut oil, and beeswax into a microwave-safe measuring cup with a spout.
Using a measuring cup with a spout will make pouring the melted mixture into the silicone mold much easier.
Step 3: Melt the Ingredients
Heat the mixture in the microwave in 30-second intervals.
Carefully stir between each heating session using a wooden craft stick.
Continue heating in short intervals until the shea butter, coconut oil, and beeswax have melted completely.
Do not leave the mixture unattended or overheat it. The melted oils and wax can become very hot.
Step 4: Add the Vanilla Essential Oil
Remove the measuring cup from the microwave and allow the mixture to cool slightly while remaining liquid.
Stir in 15 drops of the vanilla fragrance ingredient, provided this amount is within the supplier’s skin-safe usage guidance.
Mix gently until evenly incorporated.
Step 5: Add the Vanilla Bean Powder
Add ¼ teaspoon vanilla bean powder to the melted mixture.
Stir thoroughly to distribute the vanilla bean powder throughout the oils and wax.
The vanilla bean powder creates the delicate speckled appearance of the finished lotion bars.
Step 6: Pour into the Silicone Mold
Place your silicone mold on a flat, stable surface.
Carefully pour the melted lotion mixture into each cavity of the mold.
Divide the mixture as evenly as possible to create approximately 12 individual lotion bars.
Step 7: Allow the Lotion Bars to Set
Leave the filled mold undisturbed for approximately 2–3 hours, or until the bars are completely solid.
Setting time may vary depending on the temperature of your home and the size of your mold.
Step 8: Remove and Store
Once the lotion bars are completely firm, gently remove each one from the silicone mold.
Place the finished bars in an airtight container and store them in a cool, dark location.
Your homemade Vanilla Bean Lotion Bars are ready to use!
Step-by-Step Vanilla Bean Lotion Bar Photos
Follow along with the original preparation photographs showing how to combine the ingredients, add the vanilla, and pour the mixture into the silicone mold.


Finished Homemade Vanilla Bean Lotion Bars
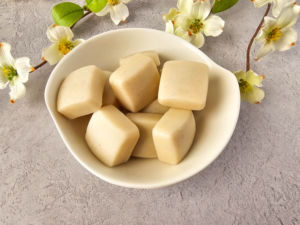
Once the bars have hardened and been removed from the silicone mold, you’ll have a batch of smooth, lightly speckled vanilla lotion bars ready to use or package as gifts.

How to Use Homemade Lotion Bars
Using a solid lotion bar is simple.
- Make sure your hands and skin are clean and dry.
- Hold the lotion bar between your hands for a few seconds.
- Gently rub the bar over the area you want to moisturize.
- Massage the softened oils and butter into your skin.
- Allow the moisturizer to absorb before handling delicate fabrics.
These bars are especially convenient for moisturizing dry hands, elbows, knees, and other small areas.
Tips for Making the Best Vanilla Bean Lotion Bars
- Use a kitchen scale: Accurate measurements are important for getting the right texture.
- Melt slowly: Heat in short intervals and stir frequently.
- Choose skin-safe ingredients: Use cosmetic-grade ingredients appropriate for leave-on skincare products.
- Mix thoroughly: Stir the vanilla powder well to distribute it throughout the mixture.
- Use silicone molds: Flexible molds make removing the finished bars easier.
- Allow enough setting time: Wait until the bars are completely solid before unmolding.
- Store away from heat: Warm temperatures can soften or melt homemade lotion bars.
Why Use Beeswax in Homemade Lotion Bars?
Beeswax is one of the ingredients that makes solid lotion bars possible.
Without enough wax, a mixture of shea butter and coconut oil may be too soft to hold its shape at room temperature.
Beeswax helps create a firmer bar while contributing to the protective feel of the finished product.
In this recipe, equal weights of beeswax, shea butter, and coconut oil create a simple base for small solid lotion bars.
How to Store DIY Vanilla Bean Lotion Bars
Store your homemade lotion bars in a clean, airtight container in a cool, dry, dark location.
Keep the bars away from direct sunlight, heat, and moisture.
Because this recipe does not contain added water, it differs from a traditional water-based lotion. However, clean handling is still important, and the bars should be discarded if they develop an unusual odor, appearance, or signs of contamination.
The usable life depends on the freshness and stability of your ingredients. Do not assume a fixed shelf life without testing.
Can You Travel with Homemade Lotion Bars?
Yes! One of the benefits of solid lotion bars is their convenient size.
These individual bars can fit into small containers or tins, making them easy to pack in a purse or travel bag.
Choose a leak-resistant container to protect your belongings in case the bars soften in warm temperatures.
Avoid leaving them in a hot car or direct sunlight.
DIY Vanilla Bean Lotion Bars Make Great Homemade Gifts
If you enjoy making thoughtful handmade gifts, these vanilla lotion bars are a lovely option.
Package them in small metal tins, reusable containers, or decorative boxes for birthdays, holidays, or simple thank-you gifts.
You can add a label with the product name, ingredients, and storage directions.
If gifting these lotion bars, include a note that they contain coconut oil, shea butter, beeswax, and fragrance ingredients so recipients can check for potential sensitivities.
Budget-Friendly Homemade Skincare
At Crazy For Couponing, we love finding creative ways to make everyday essentials and thoughtful gifts while staying on budget.
DIY Vanilla Bean Lotion Bars are a fun project that can be made using ingredients purchased in quantities large enough for multiple batches.
Compare prices on shea butter, beeswax, coconut oil, and silicone molds before purchasing.
Reusable molds and measuring tools can also help keep the cost of future batches down.
Making homemade gifts is a wonderful way to create something personal without spending a fortune.
DIY Vanilla Bean Lotion Bars Project Card
Easy Homemade Vanilla Bean Lotion Bars
Solid moisturizing lotion bars made with shea butter, coconut oil, beeswax, vanilla fragrance, and vanilla bean powder.
Ingredients
- 1.5 oz shea butter
- 1.5 oz coconut oil
- 1.5 oz beeswax
- 15 drops skin-safe vanilla fragrance, subject to supplier usage limits
- ¼ tsp vanilla bean powder
Equipment
- Square silicone mold
- Microwave-safe measuring cup with spout
- Wooden craft stick
- Kitchen scale
- Airtight storage container
Instructions
- Weigh 1.5 oz each of shea butter, coconut oil, and beeswax using a kitchen scale.
- Add the shea butter, coconut oil, and beeswax to a microwave-safe measuring cup.
- Heat in 30-second intervals, stirring between each interval, until fully melted.
- Allow the mixture to cool slightly while remaining liquid, then stir in the vanilla fragrance ingredient according to its skin-safe usage guidance.
- Add ¼ teaspoon vanilla bean powder and stir until evenly distributed.
- Carefully pour the melted mixture into the silicone mold, dividing evenly between 12 cavities.
- Allow the bars to set undisturbed for approximately 2–3 hours, or until completely solid.
- Gently remove the lotion bars from the mold and store in an airtight container in a cool, dark location.
Project By: Crazy For Couponing
Frequently Asked Questions About Homemade Lotion Bars
Do I need a kitchen scale to make lotion bars?
Yes. This recipe uses ounces by weight for the shea butter, coconut oil, and beeswax. A kitchen scale helps ensure the ingredients are measured accurately.
How long do vanilla bean lotion bars take to harden?
The original recipe calls for approximately 2–3 hours of setting time. The exact time may vary depending on the size of the mold and room temperature.
Can I use a different silicone mold?
Yes! You can use different silicone mold shapes, but the number and size of finished bars will vary.
Can I make these lotion bars without vanilla fragrance?
Yes. You can omit the fragrance ingredient for an unscented version. The bars will still have the natural aroma of the shea butter, coconut oil, and beeswax.
Why are my lotion bars too soft?
Lotion bars can soften when exposed to heat. Incorrect ingredient measurements can also affect their firmness.
Make sure to weigh your ingredients accurately and store the finished bars in a cool location.
Can I use lotion bars every day?
Many people use solid moisturizers as part of their regular skincare routine. Apply a small amount as needed, provided the ingredients are suitable for your skin and do not cause irritation.
Can homemade lotion bars be given as gifts?
Yes! Package fully hardened bars in clean containers and include an ingredient label, basic usage instructions, and storage recommendations.
Make Your Own DIY Vanilla Bean Lotion Bars
These homemade DIY Vanilla Bean Lotion Bars are a simple way to explore making your own skincare products.
With shea butter, coconut oil, beeswax, and vanilla, you can create small, convenient solid lotion bars that are easy to store and enjoyable to give as handmade gifts.
Whether you’re looking for a weekend DIY project, a homemade gift idea, or a way to try making your own solid moisturizer, this easy tutorial is a great place to start.
Give these vanilla lotion bars a try and share your creations with Crazy For Couponing!
For more DIY projects, homemade gift ideas, recipes, and money-saving inspiration, visit Crazy For Couponing .
Savings to Splurge